Vegetable Gardening
Garden Design
Row Orientation
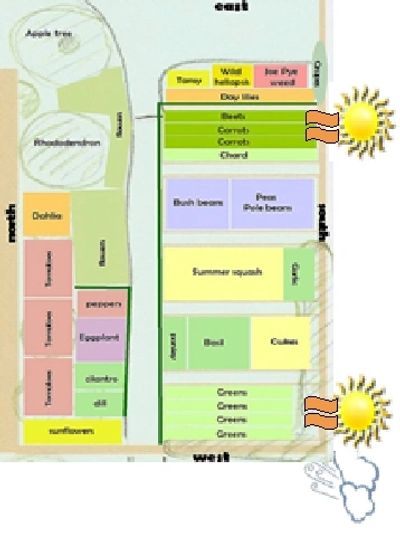
Whenever possible, the rows in the vegetable garden should run NORTH and SOUTH, for best sun exposure and air circulation. If the rows run east and west the first row tends to shade the second row, the second row the third and so forth…
- The tall crops such as peas, beans, and corn should be planted on the north side of the vegetable garden. In this way they will not shade the rest of the vegetable crops. Corn should be planted in East/West running rows if prevailing winds are from the SW. This will help to protect them from severe wind damage. Plant corn in blocks for successful pollination, leaving 30” between rows.
- At the very southern end of the garden plant the low-growing crops like radishes, carrots, beets, lettuce, onions and other low growers.
- Notice that the diagram does not exactly match the suggested layout of crops as described above. All gardens are different. You may not have the option to run rows in a North South direction. Or you may want to plant crops next to each other based on companion planting techniques. These are just some suggestions for you to think about while taking into account your specific resources and needs.
Frost Pockets
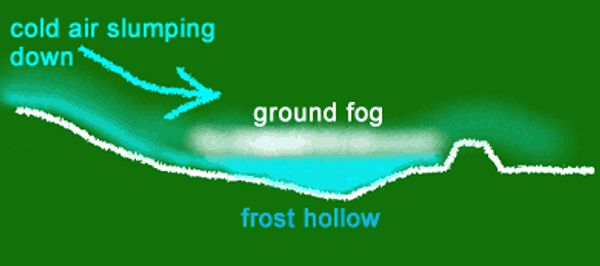
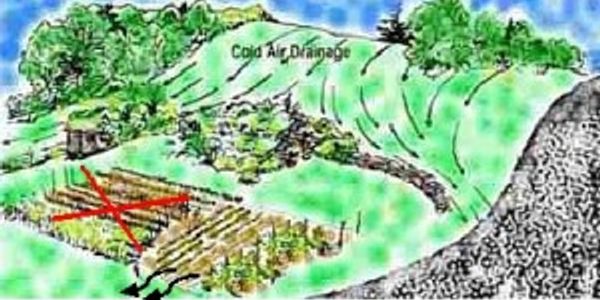
If your garden is on a slope or in a low spot, you should check for potential frost pockets, and orient rows to drain air accordingly. Cold air is dense and heavy. It is so heavy that it flows downhill and, like water and pools in low places. The temperature in a valley may be as much as 18° lower than the temperature on the adjoining slope. Likewise, the temperature in your garden varies from a point on a sunny slope near a wall to the hollow in the bottom of your garden.
When the air temperature falls below freezing, it can damage plants caught in the pool or chilled in the passing flow. Extremely susceptible plants, such as tomatoes and peppers, may even be harmed by near-freezing temperatures. In rugged terrain, cold-air/frost pocket regions can produce a totally different micro-ecosystem with a substantially shorter growing season. Although the focus here is on the colder temperatures of late summer/early autumn, the same conditions may occur in spring/early summer when plants are more susceptible to frost damage.
But since cold air flows downhill like water, it can also be diverted — and even halted — by terrain features such as rock outcrops, thick hedges, earth berms, or dense stands of trees. That fact has not been lost on farmers, vineyard growers and gardeners who have taken the hint and created artificial barriers to divert the cold air flow around their fields and plants. These frost dams, are most often dense collections of shrubs and low conifers with tight fencing, although buildings will work too.
Frost Dams May Help Protect Sensitive Crops From Damage
If artificial frost dams aren’t an option, orient your rows so that cold air drains out of the garden as much as possible to reduce cold air from pooling around plants. If your garden is on a slope or in a low spot, you should check for potential frost pockets, and orient rows to drain air accordingly. Cold air is dense and heavy. It is so heavy that it flows downhill and, like water and pools in low places. The temperature in a valley may be as much as 18° lower than the temperature on the adjoining slope. Likewise, the temperature in your garden varies from a point on a sunny slope near a wall to the hollow in the bottom of your garden. When the air temperature falls below freezing, it can damage plants caught in the pool or chilled in the passing flow. Extremely susceptible plants, such as tomatoes and peppers, may even be harmed by near-freezing temperatures. In rugged terrain, cold-air/frost pocket regions can produce a totally different micro-ecosystem with a substantially shorter growing season. Although the focus here is on the colder temperatures of late summer/early autumn, the same conditions may occur in spring/early summer when plants are more susceptible to frost damage. But since cold air flows downhill like water, it can also be diverted — and even halted — by terrain features such as rock outcrops, thick hedges, earth berms, or dense stands of trees. That fact has not been lost on farmers, vineyard growers and gardeners who have taken the hint and created artificial barriers to divert the cold air flow around their fields and plants. These frost dams, are most often dense collections of shrubs and low conifers with tight fencing, although buildings will work too.
Row Covers For Frost/Wind Protection
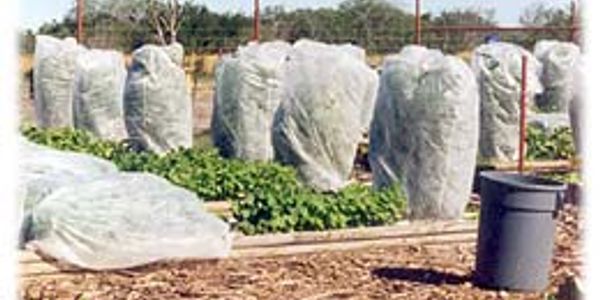
Row Covers increase air and soil temperature – it traps and collects heat during the day and releases it at night to keep your plants warm and growing! – Use them in Spring to get a jump start on your garden and keep away pests. – Use them in Fall to extend your harvest and growing season. Row covers also protect against wind damage and sunscald as well as damage from insects, birds and pesky browsers. Materials for use can range from plastic sheeting to meshed fabric in the form of floating row covers or frost blankets. • Floating Row Cover or Frost Blanket Easy to install- just spread or “float” the lightweight fabric over your plants. Be sure to tie it down at the ends or high winds could cause it to damage plants if not anchored properly! Can be cut to any size or shape with ordinary scissors. * Lowes and Home Depot carry 10’X50’ frost blankets. *Green House & Garden Supply in Albuquerque carries rolls of plastic 30’X100’ (Higher grade than contractor plastic that will last much longer against our high UV.) • Grow Web Grow Web Fiber Row Cover—Protects plants from grasshopper and other insect damage without using toxic chemicals. Keeps the bad guys out but lets in air, sun and water, and provides frost protection. Can be used on vegetables, ornamentals, shrubs and small trees. Can also protect against browsing pests such as DEER! 12.3′ x 32.8′ roll averages $30/roll

Wind and Heat Damage
Plant on the North or East side of your home or other structure if possible. In high wind areas it may be necessary to plant crops at a 90 degree angle to the prevailing winds. This will also help cold air drain away from plants, avoiding a frost pocket. · Create or Plant Windbreaks You can’t keep the wind out of your garden entirely. There is no magic solution. But you can slow it down with windbreaks and shelterbelts. If you live in an exposed area, check for the direction of the coldest winds and build your shelter belt across that direction. Don’t make the common mistake of installing a solid barrier as these will increase the problem by creating eddies on both sides of the fence or barrier. Instead, choose a structure that is at least 50% wind permeable – such as a trellis, series of hedges, or a group of trees underplanted with shrubs – and you will create a very effective windbreak. Make sure that your windbreak is as wide as possible to prevent the wind simply sneaking around the side and increasing in speed and ferocity. When planting your shelterbelt, try to choose wind tolerant plants and remember to include a good mix of evergreens in with your deciduous specimens.
SHADE FROM WEST AFTERNOON SUN IS A MUST! Plants must be protected against late afternoon’s scorching, summer sun. When planting on the N or E side isn’t possible, you can create shade. Instant shade cloth is available at local stores. No sewing is required. It can be cut to length and clips attached to the sides to secure the lines. Trellises, pergolas, screens or any number of other shade options are available.
If You Have To Garden On A Hill Or Slope
- Set rows perpendicular to the slope and use contour or terraced gardening.
- Leave crop stubble over winter to reduce runoff erosion.
- Only till if absolutely necessary. No-till allows soil to form Peds, increasing soil structure and reducing erosion.

Raised Beds/Container Gardens
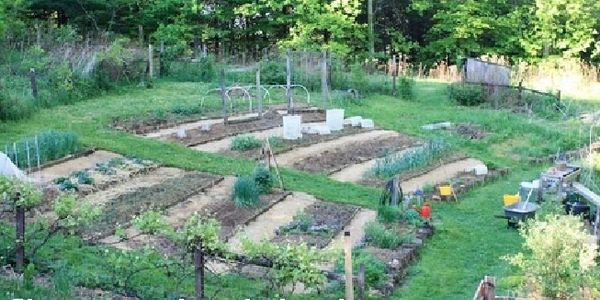
In areas of poor soil, use raised beds or plant in containers to give plant roots room to develop. Raised beds can also help to raise the soil temperature in colder climates, extending the growing season. Raised beds also make it easier to erect covers over plants to protect from wind, frost, insect or pest damage. They can be constructed in a manner that also aids in preventing damage from burrowing animals. On slopes, raised beds can be terraced to maximize space.
Consider Square Foot Gardening
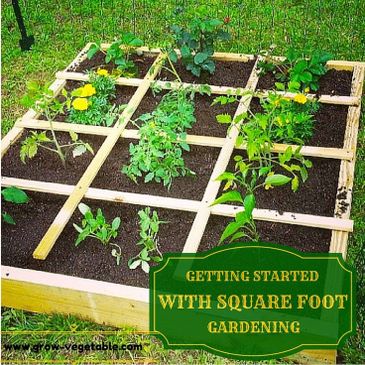
Square Foot Gardening is a technique of intensive planting based on a grid of 1-foot by 1-foot squares, with single seeds or plants placed in carefully determined spacing. The square foot system lets you make the most of your garden space to conserve the amount of water, soil conditioners, and labor needed to produce a maximum amount of food in that space. A square foot garden takes only one-fifth the space and work of a conventional single-row garden to produce the same harvest.
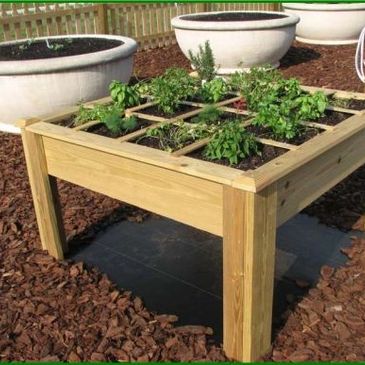
Benefits of Square Foot Gardening
• Requires very little space; 80% less than conventional gardening. • Can be done in as little as 4 feet by 4 feet, or as large as you want. • Your existing (bad) soil doesn’t matter because it’s not used. Start with an ideal soil mix that is weed-free and requires no tilling. • Uses much less water; only about 20% compared to conventional gardening. • The planting method requires no thinning and very few seeds. • Can be easily covered and or fenced to extend the growing season and to protect plants from pests. • Produces 5 times the harvest of a conventional garden. • Can be done by those with physical or mental limitations. If getting down is a problem, raise the boxes to a wheelchair level.
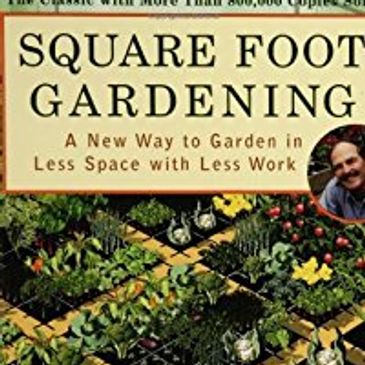
Ten Basic Tenets of Square Foot Gardening
1. Layout. Arrange your garden in squares, not rows. Lay it out in 4′x4′ planting areas. 2. Boxes. Build boxes to hold a new soil mix above ground. 3. Aisles. Space boxes 3′ apart to form walking aisles. 4. Soil. Fill boxes with special soil mix: 1/3 blended compost, 1/3 peat moss, and 1/3 coarse vermiculite. 5. Grid. Make a permanent square foot grid for the top of each box. A MUST 6. Care. NEVER WALK ON YOUR GROWING SOIL. Tend your garden from the aisles. 7. Select. Plant a different flower, vegetable, or herb crop in each square foot, using 1, 4, 9, or 16 plants per square foot. 8. Plant. Conserve seeds. Plant only a pinch (2 or 3 seeds) per hole. Place transplants in a slight saucer-shaped depression. 9. Water. Water by hand from a bucket of sun-warmed water. 10. Harvest. When you finish harvesting a square foot, add compost and replant it with a new and different crop.
What to Do When
In The Fall…
Add manure, compost, alfalfa hay/pellets, or other types of amendments to the soil. Rototill or dig it in. Do not over till the soil! Water garden thoroughly. · Allow the weeds to come up but do not let them go to seed (weeds will act as green manure). Add fertilizer to the soil and till or dig it in during the last till. Again be careful not to over till! Over tilling can destroy soil structure and increase potential for erosion. Untilled soil allows Peds to form. Peds are clumps of soil that form naturally and aid in the movement of air and water. Manure should be added at least 6 weeks prior to planting to prevent burning plants. ü Steer, Sheep & Lama Manures are great for the garden. Lama manure is weed free. v Chicken manure is too hot v Horse manure is not as nutritive and carries a lot of weed seeds If garden plot is large enough you will probably need to use a tilling method. To avoid damaging the soil’s structure, consider planting in alternate rows each year. At the end of the season, mow down the crop rows and till the thatch into the next row to improve soil for next season. Leave crop stubble standing to reduce erosion and to help protect the soil from compaction next season when you are walking on those rows. This allows rows to lay fallow every other season, and will improve the soil’s structure and fertility.
Early Spring…
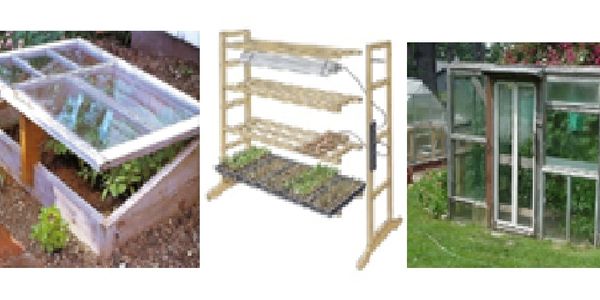
Start seeds indoors, under grow lights or outside in a green house or cold frame.
See attachment: How To Build A Cold Frame
Use tables below as a General Guide ONLY!
- Elevation – Average First Frost – Average Last Day of Frost
Mountains – Oct. 19th (2007 was Sep 19th) – May 20th
Low Elevations – October 10th – April 10th - Elevation – Start Seeds – Plant
HIGH Elev. WARM season crops – 1st week of March – First week of May
*Use short season crops
LOW Elev. WARM season crops- 1st week of Feb. – First week of April
HIGH Elev. COOL season crops May – June Jul.-Aug.
*Use short season crops
LOW Elev. COOL season crops October
It’s always best to ask a SUCCESSFUL gardener in your area for recommendations!
High Elevation – A Mayhill nursery recommends not planting tomato starter plants until after Mother’s Day, and cautions that even then it is still “Iffy.” They recommend transplanting Basil outside in June or July. The Lincoln County Garden Club recommends sowing seeds directly in the ground between Feb 15th-April 30th (Cool season crops) / Mid-March – Mid-to-late April (Warm season crops).
For a list of specific recommendations for planting dates based on each crop
See: NMSU Publication 457-B Growing Zones.
If you don’t start plants from seed, try to purchase starter plants as locally as possible. Local nurseries and local plant sales, at similar elevations are great resources. When you purchase a plant ask if they have been “Hardened off.” “Hardening off refers to the process of acclimating plants from indoor temperatures to the outdoors. Because plants usually are grown in greenhouses (or, as seedlings in our kitchen window!), they’ve been pampered. They need to be introduced slowly to the elements of wind and intense sun.
Initially, you will put plants outdoors only for short periods of time, perhaps for a couple of hours. You’ll want to set them in a semi-shaded area of the yard. Gradually, you will increase the time plants are kept outdoors; you also will gradually increase their exposure to sun. After 6 to 8 days, these plants will be ready for the outdoor life.
As part of acclimating the plants to the outdoors, you also will cut back on watering. This will allow plants to toughen and will prepare them for being transplanted.
It’s a good idea to transplant on a cloudy day, when the plants won’t get full exposure to the hot sun on their first day in the ground. When you transplant, arrange soil to provide support for stems and water with a weak solution of fertilizer. Let the water do most of the work of settling soil around the roots.
Transplant outdoors after, the average last day of frost. That can vary considerably, however, especially at higher elevations. Therefore, be aware of the possibility of frost and be prepared to protect tender transplants. The use of floating row covers, water-containing ‘walls ‘o water,’ or similar other barriers can help with this problem.” Reference: http://www.extension.colostate.edu/4DMG/Garden/harden.htm

Consider Square Foot Gardening
WHAT IS SQUARE FOOT GARDENING?
Square Foot Gardening is a technique of intensive planting based on a grid of 1-foot by 1-foot squares, with single seeds or plants placed in carefully determined spacing. The square foot system lets you make the most of your garden space to conserve the amount of water, soil conditioners, and labor needed to produce a maximum amount of food in that space. A square foot garden takes only one-fifth the space and work of a conventional single-row garden to produce the same harvest.
Benefits of square foot gardening: · Requires very little space; 80% less than conventional gardening.
- Can be done in as little as 4 feet by 4 feet, or as large as you want.
- Your existing (bad) soil doesn’t matter because it’s not used. Start with an ideal soil mix that is weed-free and requires no tilling.
- Uses much less water; only about 20% compared to conventional gardening.
- The planting method requires no thinning and very few seeds.
- Can be easily covered and or fenced to extend the growing season and to protect plants from pests.
- Produces 5 times the harvest of a conventional garden.
- Can be done by those with physical or mental limitations. If getting down is a problem, raise the boxes to a wheelchair level.
Ten basic tenets of square foot gardening are:
1. Layout. Arrange your garden in squares, not rows. Lay it out in 4′x4′ planting areas.
2. Boxes. Build boxes to hold a new soil mix above ground.
3. Aisles. Space boxes 3′ apart to form walking aisles.
4. Soil. Fill boxes with special soil mix: 1/3 blended compost, 1/3 peat moss, and 1/3 coarse vermiculite.
5. Grid. Make a permanent square foot grid for the top of each box. A MUST
6. Care. NEVER WALK ON YOUR GROWING SOIL. Tend your garden from the aisles.
7. Select. Plant a different flower, vegetable, or herb crop in each square foot, using 1, 4, 9, or 16 plants per square foot.
8. Plant. Conserve seeds. Plant only a pinch (2 or 3 seeds) per hole. Place transplants in a slight saucer-shaped depression.
9. Water. Water by hand from a bucket of sun-warmed water.
10. Harvest. When you finish harvesting a square foot, add compost and replant it with a new and different crop.
To find out more about Square Foot Gardening, visit: http://www.squarefootgardening.com
Companion Planting
There are some plants that, when planted close together, will benefit each other. Likewise, there are certain combinations of plants that will inhibit the growth of one or both types of plants. Here are a few combinations:
- Plant – (Good Companions) – ………………………..X BAD COMPANIONS
- Basil – (Pepper, Tomato, Marigold)
- Bush Beans (Beets, Cabbage, Carrots, Celery, Corn, Cucumbers, Eggplant, Lettuce, Pea, Radish, Strawberry, Savory, Tansy, Marigold) …………………………. X ONION
Pole Beans – (Carrots, Corn Cucumber, Eggplant, Lettuce, Pea, Radish, Savory, Tansy)………………………………………………………………………………………X BEETS & ONIONS - Beets – (Bush Beans, Cabbage, Onion, Sage)
- Cabbage Family – (Bush Beans, Beets, Celery, Onions, Tomato, All Strong Herbs, Marigold, Nasturtium)………………………………………………………………………………….. X STRAWBERRY
- Carrots – (Bush Beans, Pole Beans, Lettuce, Onion, Peas, Radish, Tomato, Sage)…X DILL
- Celery – (Bush Beans, Cabbage, Onion, Spinach, Tomato)
- Corn – (Bush Beans, Pole Beans, Cucumber, Melons, Peas, Squash)…….X TOMATO
- Cucumbers – (Bush Beans, Pole Beans, Corn, Lettuce, Onions, Peas, Radish, Marigold, Nasturtium, Savory)………………………………………………………………...X No Strong Herbs
- Eggplant – (Bush Beans, Pole Beans, Spinach)
- Lettuce – (Bush Beans, Pole Beans, Carrots, Cucumbers, Onion, Radish, Strawberries)
- Melons – (Corn, Nasturtium, Radish)
- Onion – (Beets, Cabbage, Carrots, Celery, Cucumber, Lettuce, Pepper, Squash, Strawberries, Tomato, Savory)………………………………X Bush Beans, Pole Beans, Peas
- Parsley – (Tomato)
- Peas – (Bush Beans, Pole Beans, Carrots, Corn Cucumber, Radish, Turnips)…..X Onion
- Pepper – (Onion)
**If you save seeds, don’t plant hot peppers & bell peppers together to avoid cross pollination. - Potatoes – ……………………………………………………………………….X Tomatoes, squash
- Radish – (Bush Beans, Pole Beans, Carrots, Cucumber, Lettuce, Melons, Peas, Squash)…………………………………………………………………………………………………….X Hyssop
- Spinach – (Celery, Eggplant, Cauliflower)
- Squash – (Corn, Onion, Radish)
- Strawberry – (Bush Beans, Lettuce, Onion, Spinach)…………………………..X Cabbage
- Tomato – (Cabbage, Carrots, Celery, Onion, Mint)…………………………………X Corn, Fennel
Companion list courtesy of: http://www.gardenguides.com/how-to/tipstechniques/vegetables/vcomp.asp
Yankee Gardener’s Crop Rotation Chart
Crop rotation has been used by farmers for many years. Crop rotation now is commonly used by gardeners to control diseases and insects in the vegetable garden. It is also used to build up the organic matter and soil nutrients that certain plants use during their life cycle. Certain families of plants are subject to the same diseases and should not be planted in the same area more than once every 3 years to prevent the disease organisms from building up in the soil. Crops planted in Bed 1 are planted in Bed 2 the following year, and in Bed 3 the year after that, and then Bed 4 and back to 1 again. Every year you are building up the organic matter and soil nutrients in one bed, by adding compost and planting a cover crop, also known as “green manure”. The other crops rotate in the same direction, helping to keep your soil makeup balanced, and your garden healthy. You will start to notice a healthy improvement in your garden produce. Remember that potatoes are the unique vegetable here. While keeping them in a rotation plan, you’ll want to be sure they’re planted in a bed that has not previously grown tomatoes, peppers, or eggplant. The concept is very simple! Keep a notebook of where your crops are planted from year to year. This is a sure fire way to keep your crop rotation in line! The block chart below is a simple example of how most vegetable crops can be rotated each year in your garden.
- FIRST YEAR
Bed 1 Bed 2 Bed 3 Bed 4
Beans Broccoli Beets Add Compost
Celery Brussel Sprouts Carrots Cover Crop
Corn Cabbage Potatoes**
Eggplant Cauliflower Radishes
Onions Lettus Turnips
Peas Basil Dill
Peppers
Squash
Tomatoes - SECOND YEAR
Bed 1 Bed 2 Bed 3 Bed 4
Add Compost Beans Broccoli Beets
Cover Crop Celery Brussel Sprouts Carrots
Corn Cabbage Potatoes**
Eggplant Cauliflower Radishes
Onions Lettus Turnips
Peas Basil Dill
Peppers
Squash
Tomatoes - THIRD YEAR
Bed 1 Bed 2 Bed 3 Bed 4
Beets Add Compost Beans Broccoli
Carrots Cover Crop Celery Brussel Sprouts - FOURTH YEAR
Bed 1 Bed 2 Bed 3 Bed 4
Broccoli Beets Add Compost Beans
Brussels Sprouts Carrots Cover Crop Celery
** Do not plant potatoes where tomatoes, peppers or eggplants were previously grown

Check out these Resources & Education Guides from NMSU
Click on a link below to view/download or print info:
Home Vegetable Gardening in New Mexico
Home and Market Garden Fertilization
Determining Amounts of Fertilizer for Small Areas
Organic Gardening–Natural Insecticides
Growing Zones, Recommended Crop Varieties, and Planting and Harvesting Information
Vegetable Variety Recommendations for New Mexico Backyard Gardens
Spices and Herbs for the Home Garden
A Practical Way of Measuring Soil Moisture
Nitrogen Monitoring Techniques for Vegetable Crops
Row Cover Vegetable Production Techniques
Greenhouse Vegetable Production
Hoop House Construction: 12-ft. x 40-ft. Hoop House
Coping With Deer in Suburban Gardens
Growing Peppers in New Mexico Gardens
Chile Pepper Disorders Caused by Environmental Stress
Powdery Mildew on Chile Peppers
Verticillium Wilt of Chile Peppers
Asparagus Production in New Mexico
Raspberries for the Home Garden
Home Garden Strawberry Production
Check out this great video on SOIL BLOCK SEED STARTING – DIY: